In our previous DNS blog posts researched by Timo Longin, "Forgot password? Taking over user accounts Kaminsky style" and "Melting the DNS Iceberg: Taking over your infrastructure Kaminsky style", we've demonstrated how to identify DNS vulnerabilities in web applications and how to compromise even fully-patched WordPress instances via DNS attacks. However, finding DNS vulnerabilities isn't a trivial task. Hence Timo Longin, security expert at SEC Consult, has developed and introduced the DNS Analysis Server, which allows fine-grained DNS analysis. Even though it's a great tool, it requires the setup of a dedicated domain, a server and so on. Therefore, we've been looking for a better solution and - oh boy - we found it: A brand-new Burp Suite extension for discovering DNS vulnerabilities in web applications!
DNS Analyzer - Finding DNS vulnerabilities with Burp Suite
research news vulnerability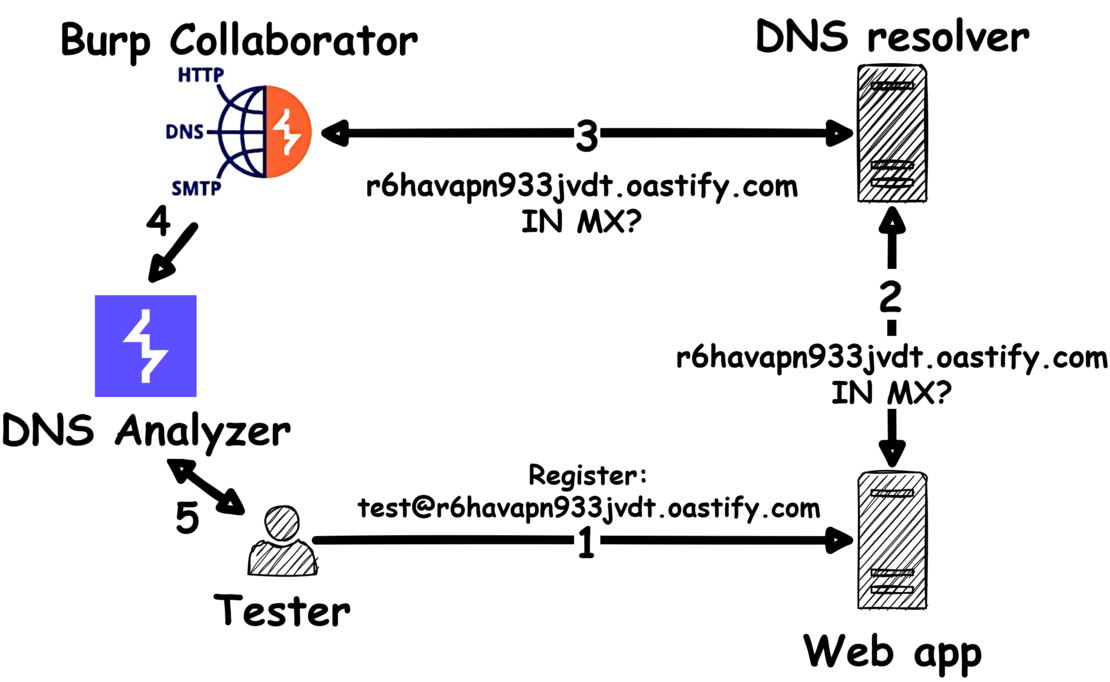
Back to the Basics
Before we get into the solution, let's take a step back for a second. Why exactly would we analyze web applications for DNS vulnerabilities? If you want a full run-down of all the little details, check out our previous blog posts here and here, but essentially, it boils down to the following attack:
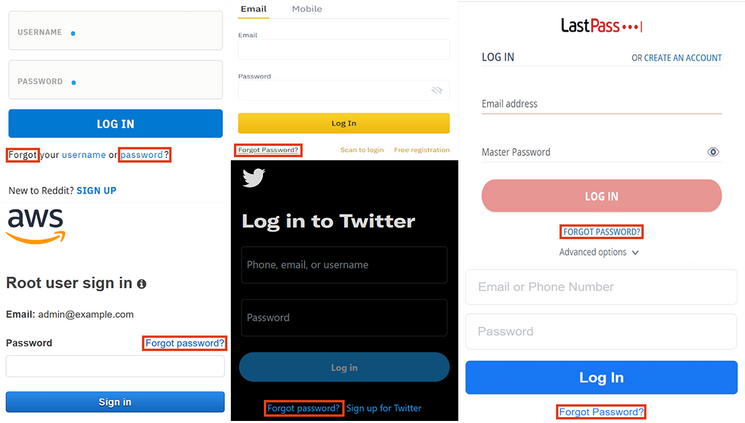
By manipulating the DNS name resolution of a web application, the "Forgot password?" feature can be abused to take over user accounts via e-mail redirection. This attack vector was first mentioned by Dan Kaminsky back in 2008, but haunts web applications even to this day.
So, how do we find vulnerable web applications and what exactly is the solution?
The DNS Analyzer
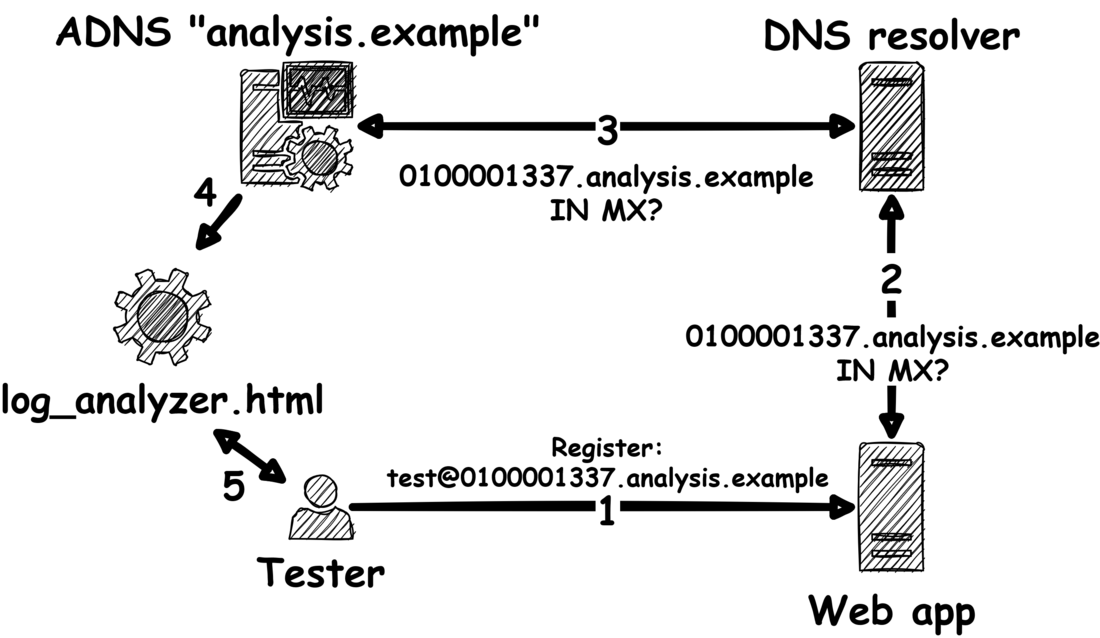
To understand the DNS Analyzer, we must first understand where we came from - the DNS Analysis Server. The DNS Analysis Server allows to analyze the DNS name resolution of a web application as depicted below:
- In the first step, we force the web application to resolve a specific domain name. In this case, the web application must resolve 0100001337.analysis.example so it can send a registration e-mail to test@0100001337.analysis.example.
- Therefore, a DNS query for the MX record of 0100001337.analysis.example is sent to the configured DNS resolver in the second step.
- The DNS resolver then tries to resolve the MX record of 0100001337.analysis.example by querying the authoritative DNS nameserver (ADNS) of analysis.example. This ADNS runs the DNS Analysis Server, which actively and passively analyzes the DNS resolver for security issues. For example, it actively returns manipulated DNS responses to the DNS resolver and it passively logs security-relevant data such as used UDP source ports.
- After the DNS Analysis Server has analyzed enough DNS traffic, a log analyzer can be used to process and visualize the results.
- Based on the results, the tester can trigger further DNS resolutions via registration, password reset, newsletter, etc..
However, as mentioned before, this setup requires an analysis domain (e.g., "analysis.example"), an analysis server (e.g., EC2 instance) and some installation effort to get everything going. Now, Burp Collaborator and DNS Analyzer come into play!
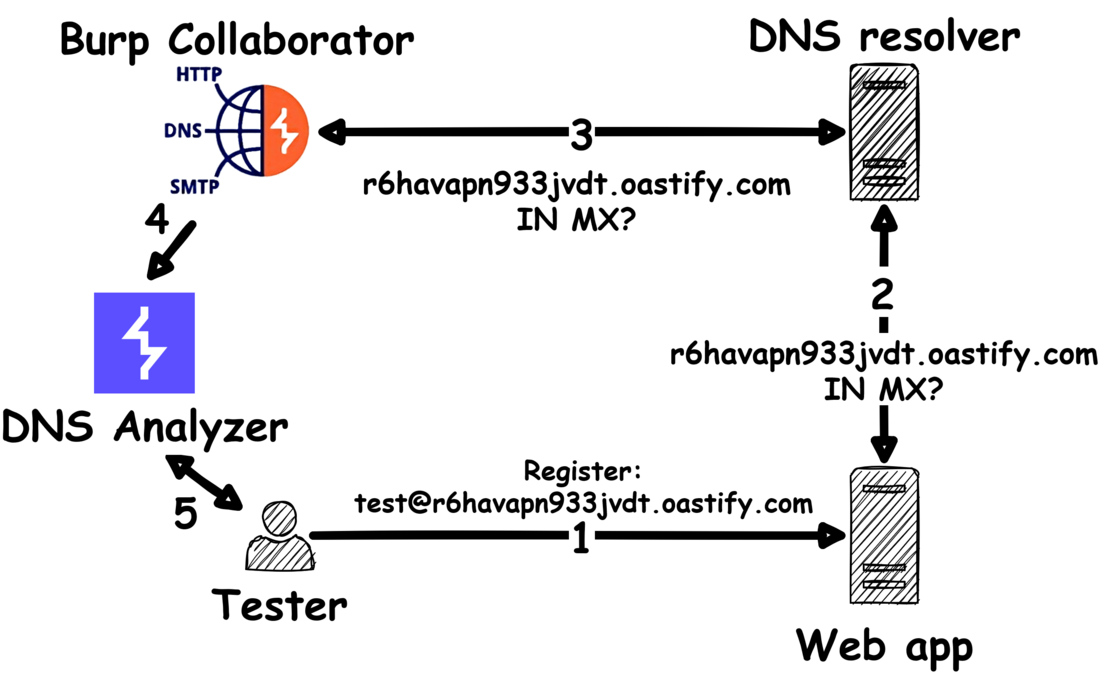
With the capabilities of the Burp Collaborator service, we can partially replace the DNS Analysis Server and do some basic but important DNS analysis directly in Burp.
- In the first step, we again force the web application to resolve a specific domain name. However, in this case, we are using a collaborator domain r6havapn933jvdt.oastify.com which was generated by the DNS Analyzer.
- Like before, the web application tries to resolve this domain name and sends a DNS query to the configured DNS resolver.
- Now, the Burp Collaborator comes into play! The Collaborator server passively logs the query from the DNS resolver and returns - contrary to the DNS Analysis Server - a non-manipulated DNS response.
- The DNS interactions received by the Collaborator server can then be analyzed in the DNS Analyzer extension.
- Based on the results, the tester can trigger further DNS resolutions via registration, password reset, newsletter, etc..
With this solution, all that is required is a Burp Suite Professional license!
DNS Analyzer - Howto
Now that we have a high-level overview of what's happening, how do we exactly use the DNS Analyzer?
After installing the extension via the instructions on GitHub, navigate to the "DNS Analyzer" tab and follow the steps below:
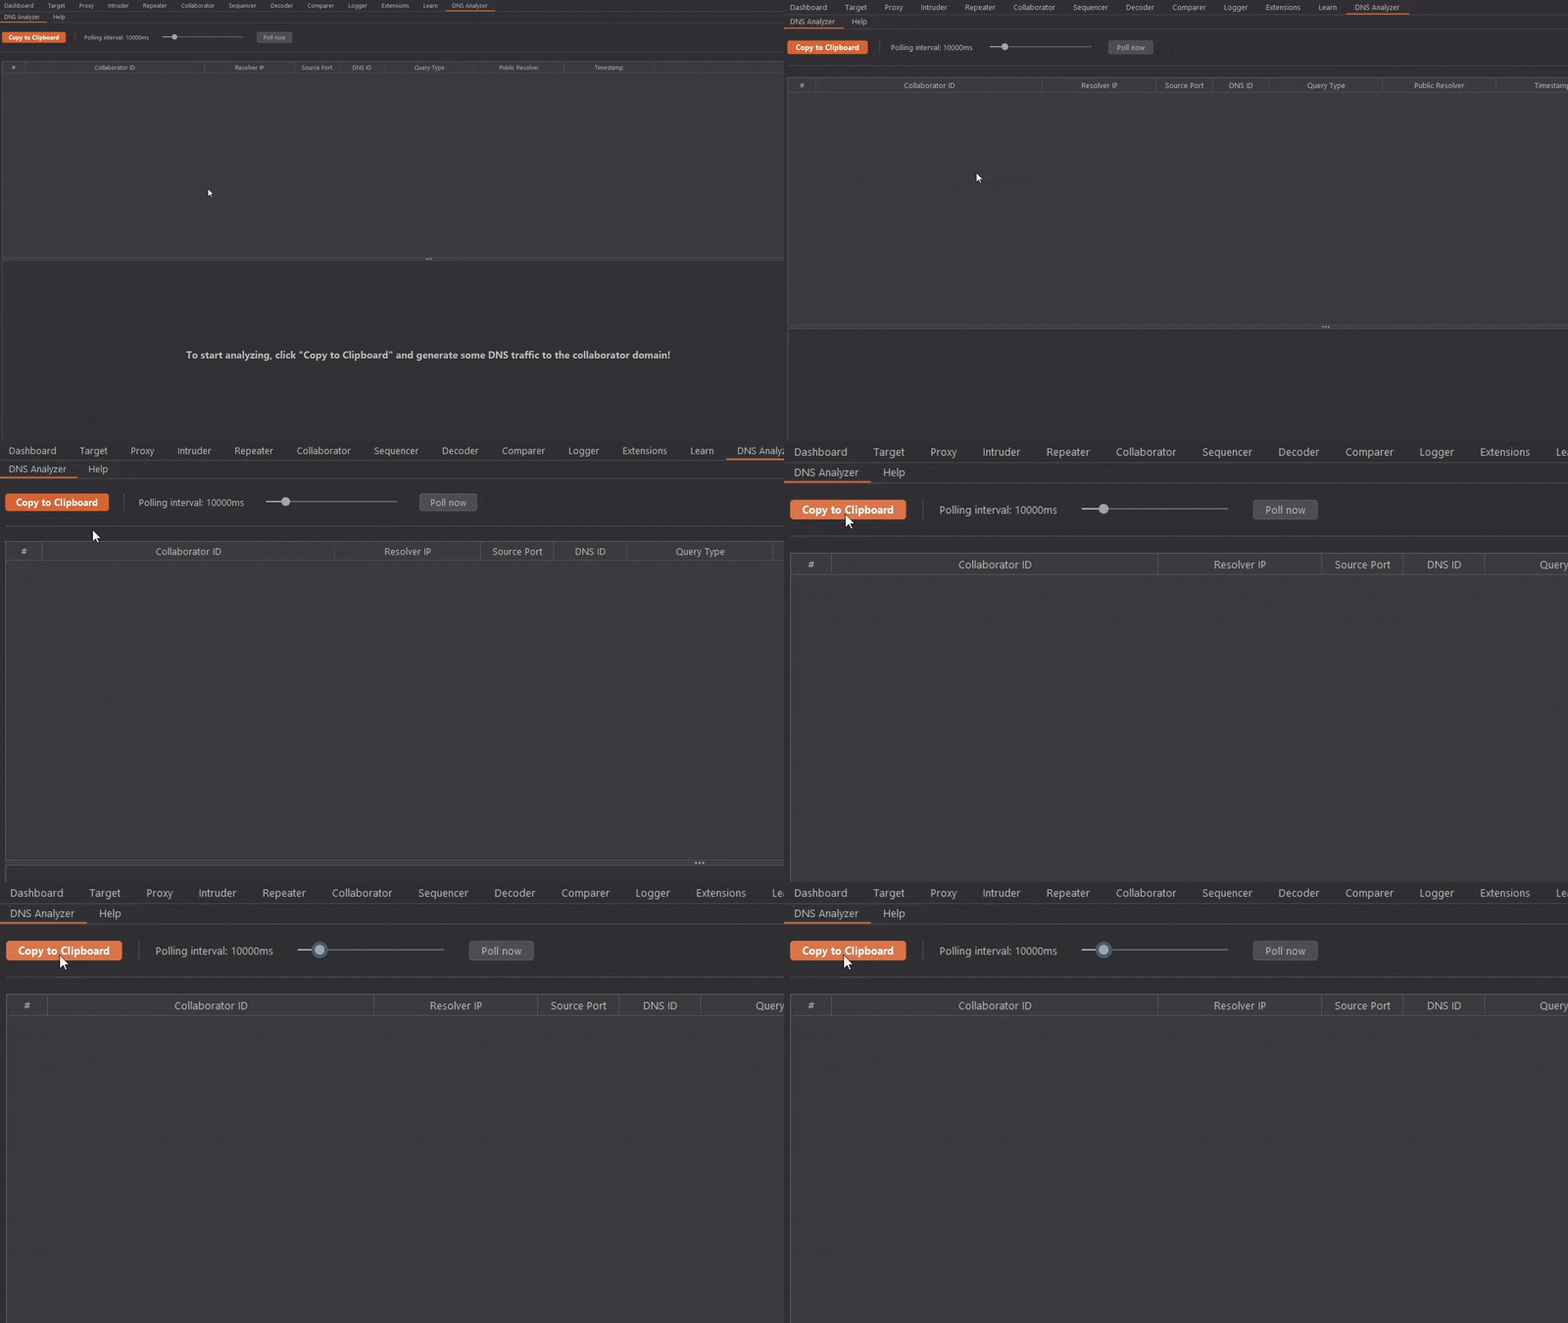
1. Click "Copy to Clipboard" to get a fresh Collaborator domain.
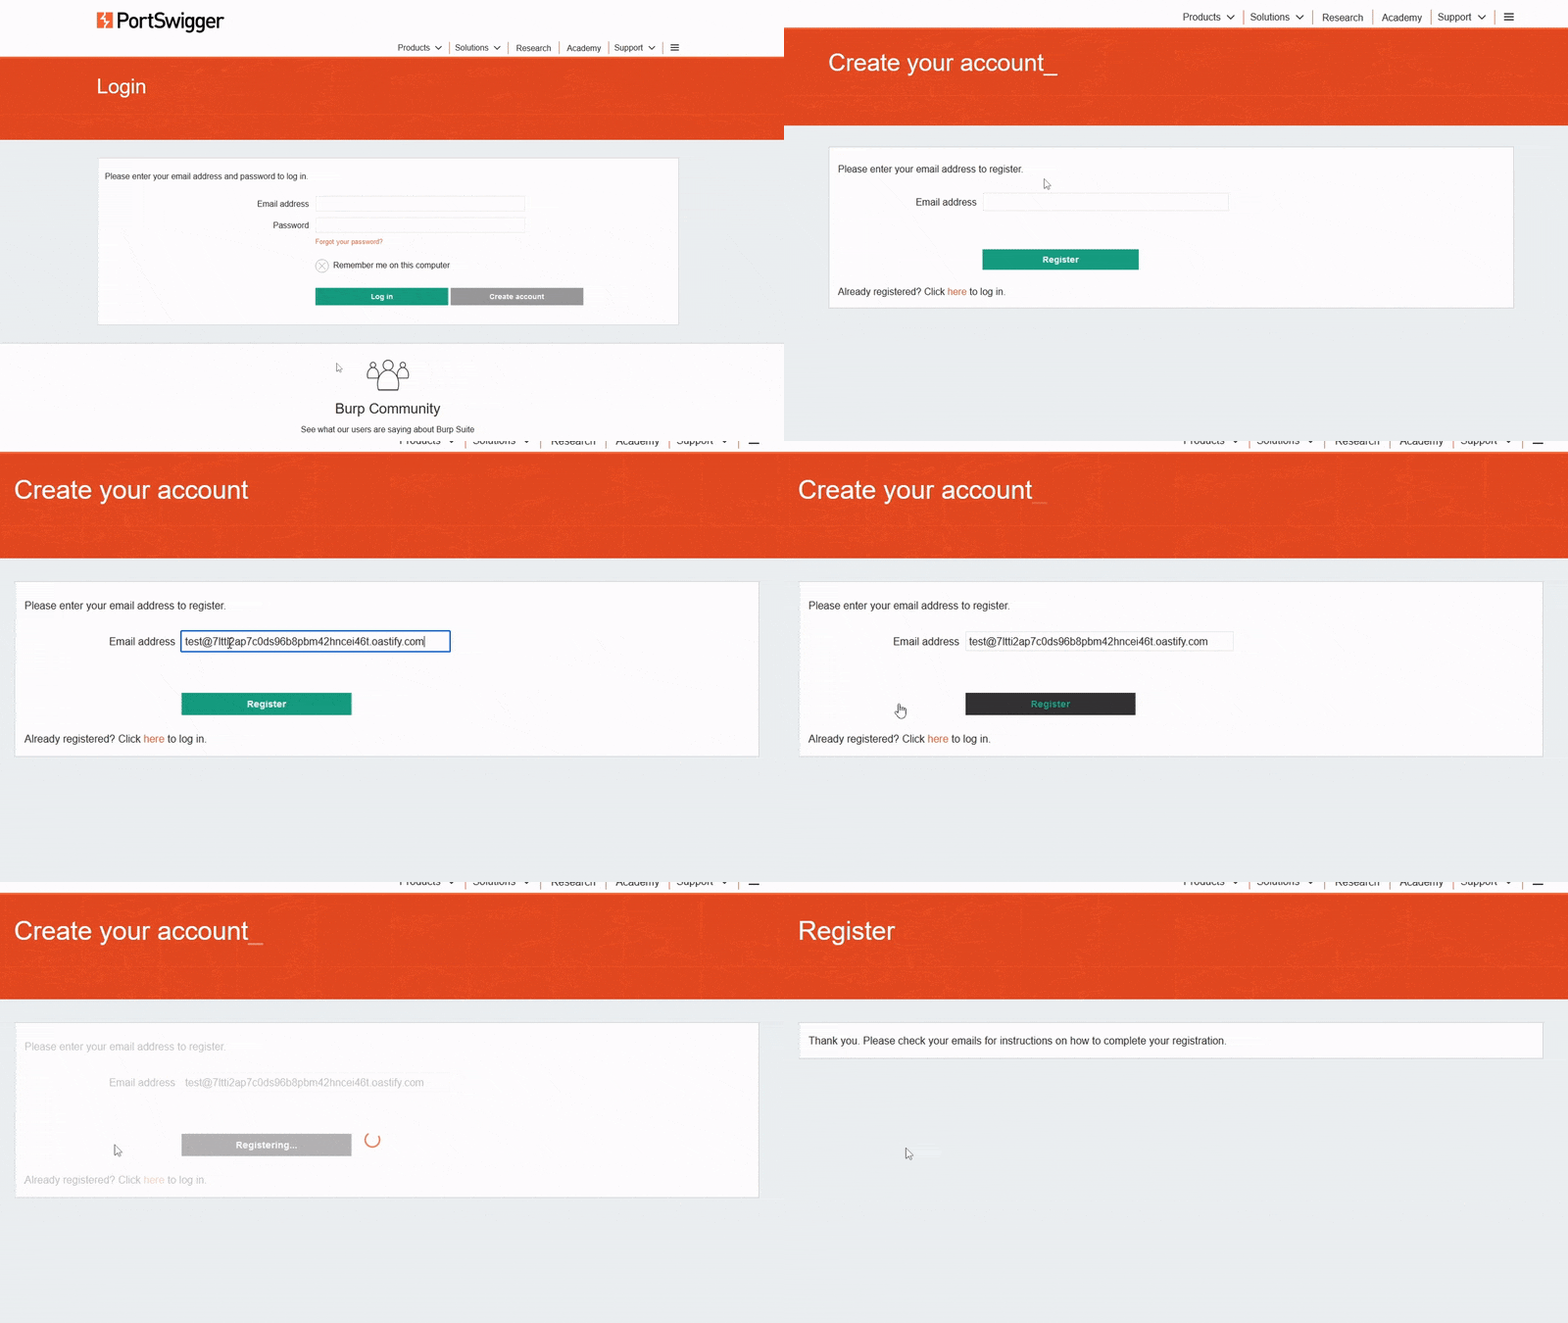
2. Trigger a DNS resolution for this domain. For example, register a user called test@[your Collaborator domain] on the target web application.
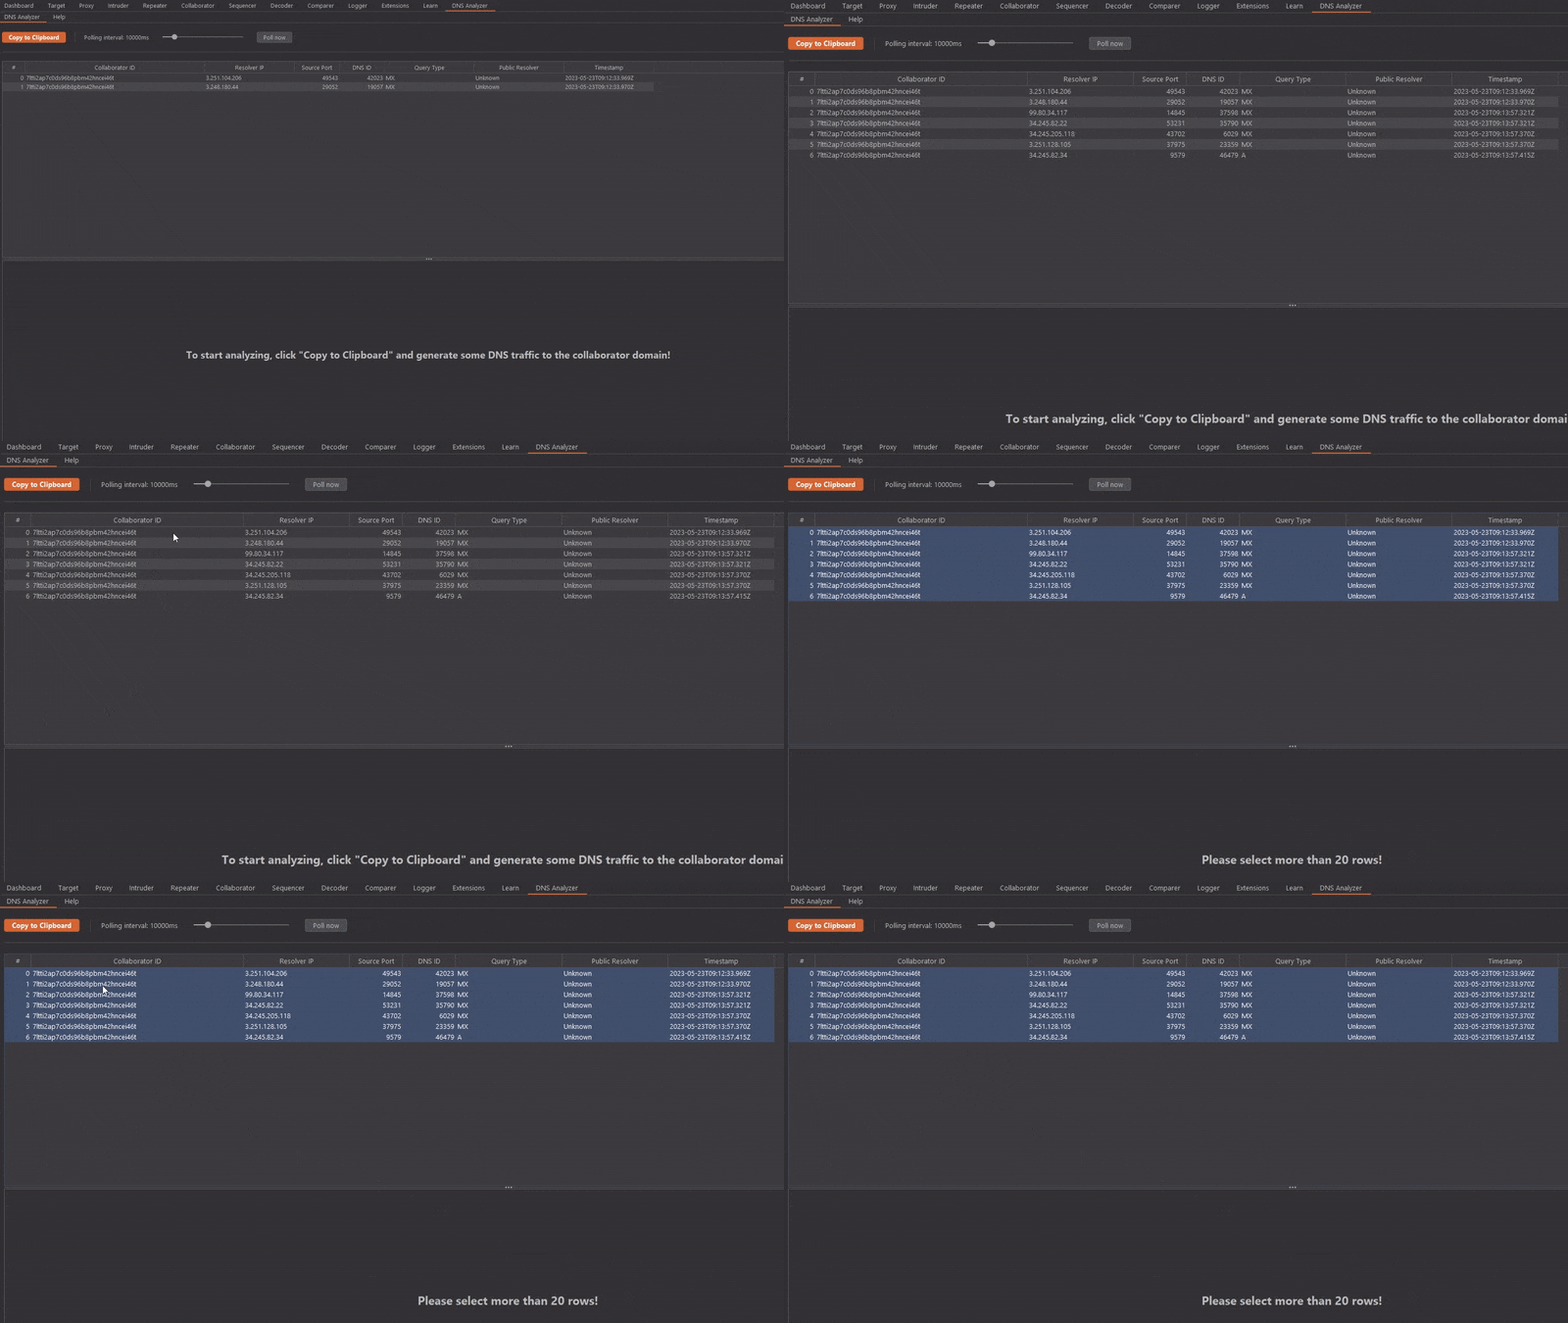
3. Watch how the interaction table fills up more and more. If required, trigger even more DNS resolutions to reach the analysis threshold of 20 interactions.
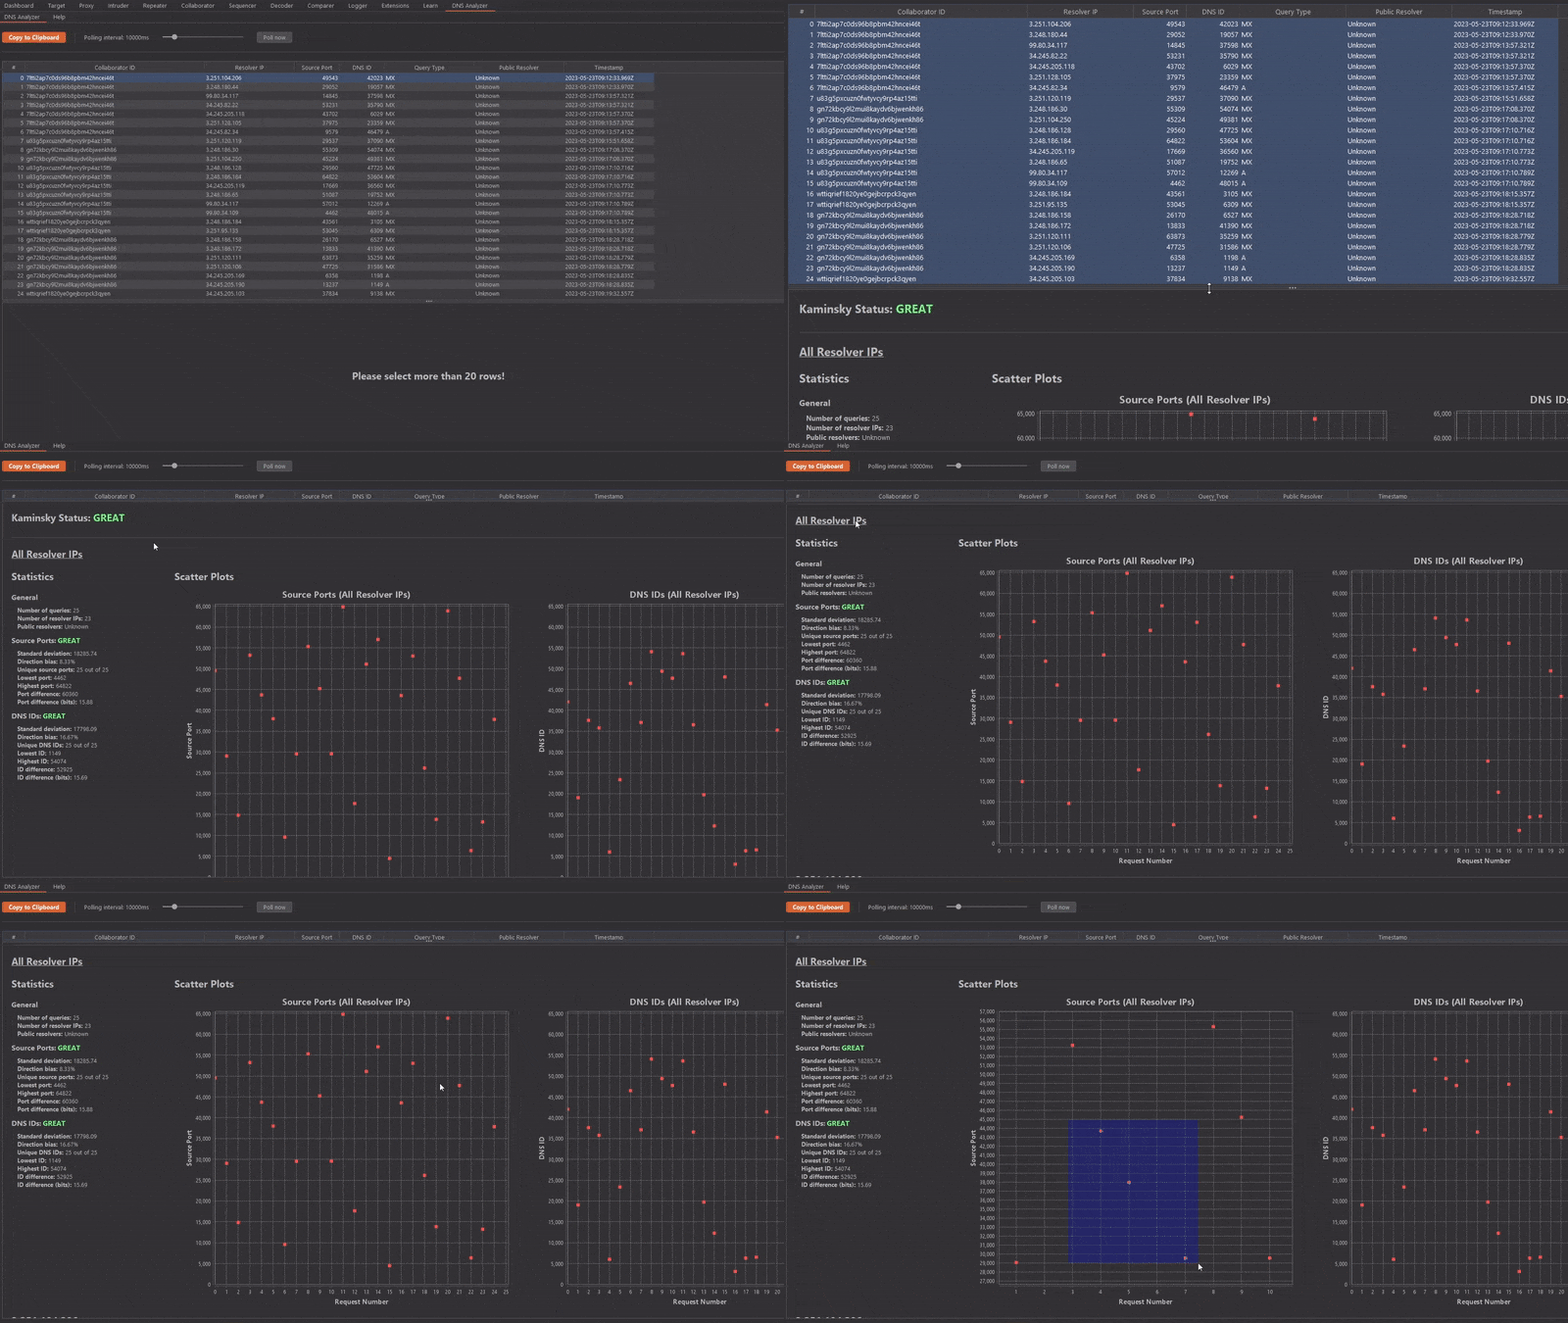
4. Select at least 20 interactions which you want to analyze. The statistics and graphs can then be analyzed in the results pane.
At this point we have a Kaminsky status, some fancy numbers and scatter plots in front of us, but how do we know if a DNS resolver is vulnerable?
DNS Analyzer - Interpreting Results
The goal and purpose of the DNS Analyzer is to be able to identify DNS resolvers that are vulnerable to Kaminsky attacks. We're not going into detail on how the Kaminsky attack works in this blog post, since we've already done this in our previous blog posts (here and here) and a quick Google search/ChatGPT prompt will do the trick! However, we can talk about the major requirement for a Kaminsky attack! Essentially, a DNS resolver is most likely vulnerable to a Kaminsky attack, if the random portions of its DNS queries (UDP source port and DNS ID) are not sufficiently random or can be guessed/predicted by an attacker. The DNS Analyzer allows us to analyze just that in the following three ways:
- Kaminsky status
- Scatter plots
- Statistics
The Kaminsky status value gets automatically generated by the DNS Analyzer upon selecting 20+ Collaborator interactions. With its three possible states POOR, GOOD and GREAT it gives a first impression about the predictability of UDP source port and DNS ID values. The following metrics are used:
Standard deviation: Checks for a low standard deviation in source port and DNS ID distributions.
- POOR: 0 - 296
- GOOD: 296 - 3980
- GREAT: 3980 - 20000+
Direction Bias: Checks if source port and DNS ID distributions are biased in an upward or downward direction.
- POOR: 80% - 100%
- GOOD: 50% - 80%
- GREAT: 0% - 20%
Port difference (bits): Checks the differences of the lowest and the highest ports and DNS IDs in bits.
- POOR: 0 - 10 bits
- GOOD: 10 - 13.75 bits
- GREAT: 13.75 - 16 bits
The metrics for these states are a mixture of the metrics from DNS-OARC and the Gibson Research Corporation (GRC). Furthermore, the DNS Analyzer always chooses the worst/lowest metric for the Kaminsky status.
However, even though the Kaminsky status and corresponding statistics are great, sometimes the human eye can spot predictable values better than the machine! That's where the scatter plots come into play!
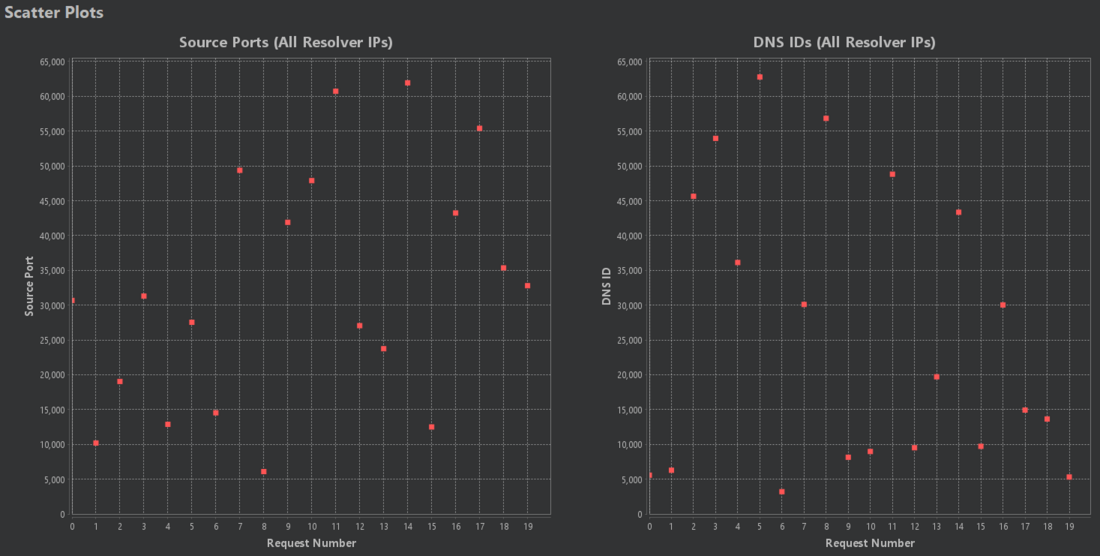
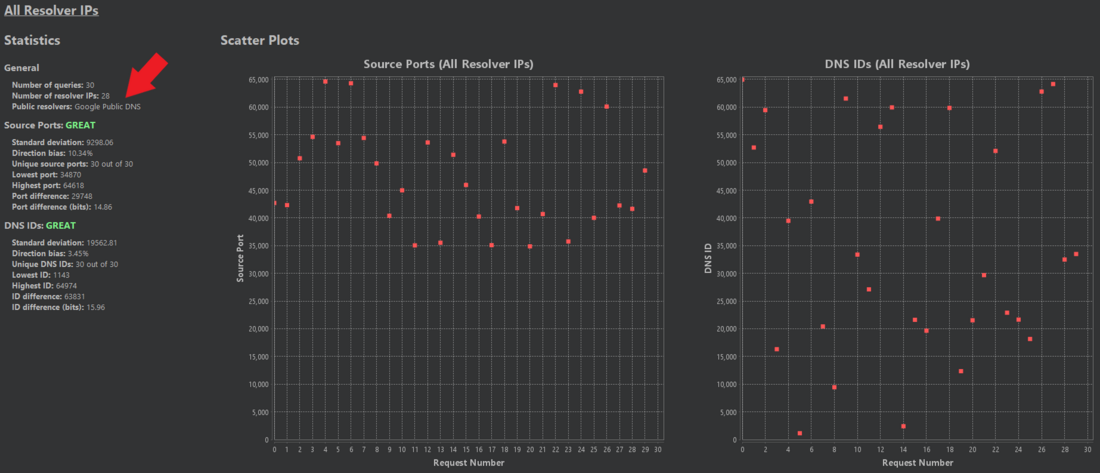
For example, when we look at the following two scatter plots, we can't see any predictable connections between source port or DNS ID values:
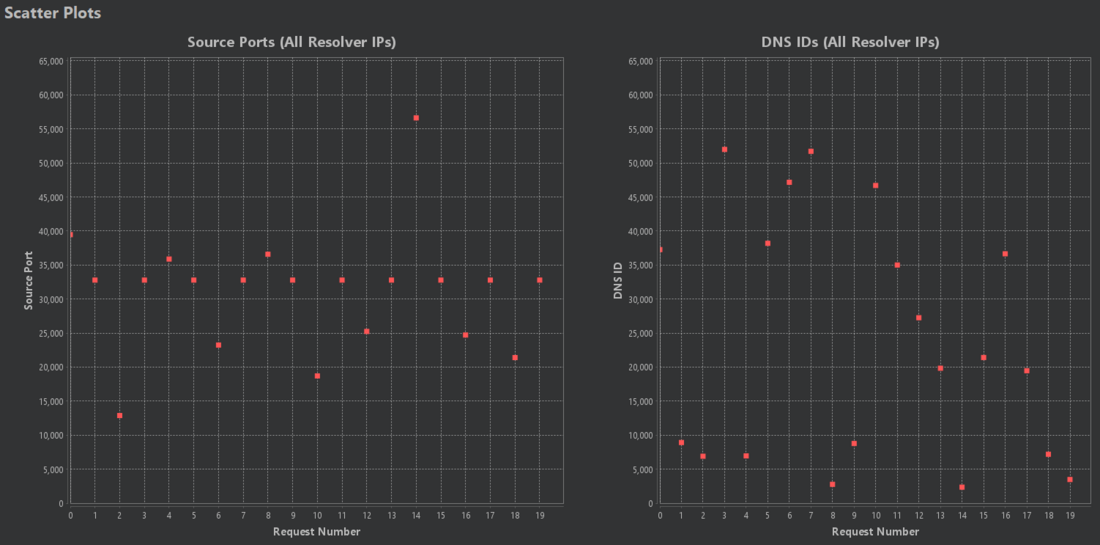
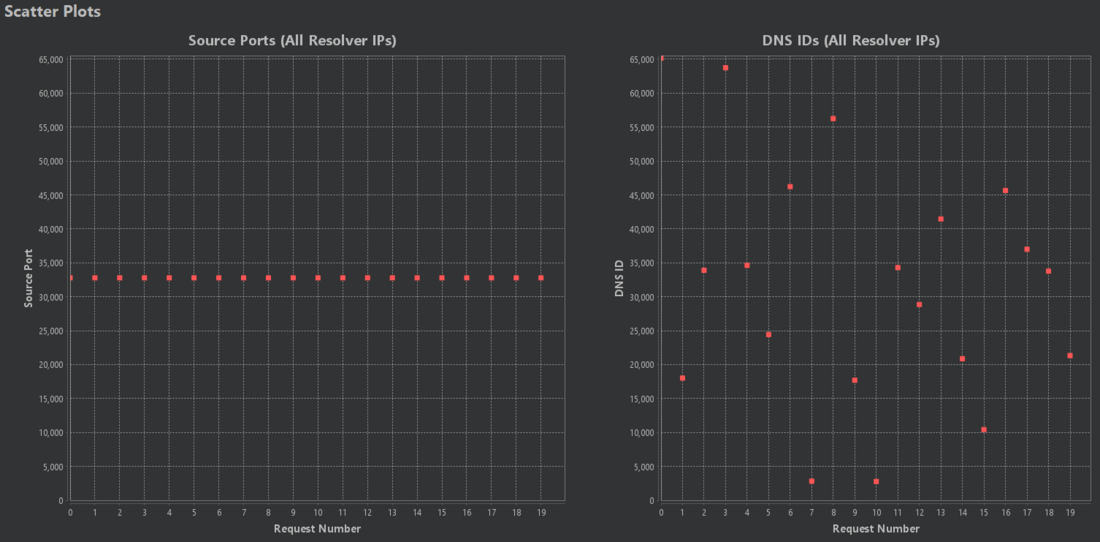
In this case, source ports are assigned statically, which is most likely attackable. Also, the DNS Analyzer correctly flagged this distribution as POOR.
Now for a trickier example:
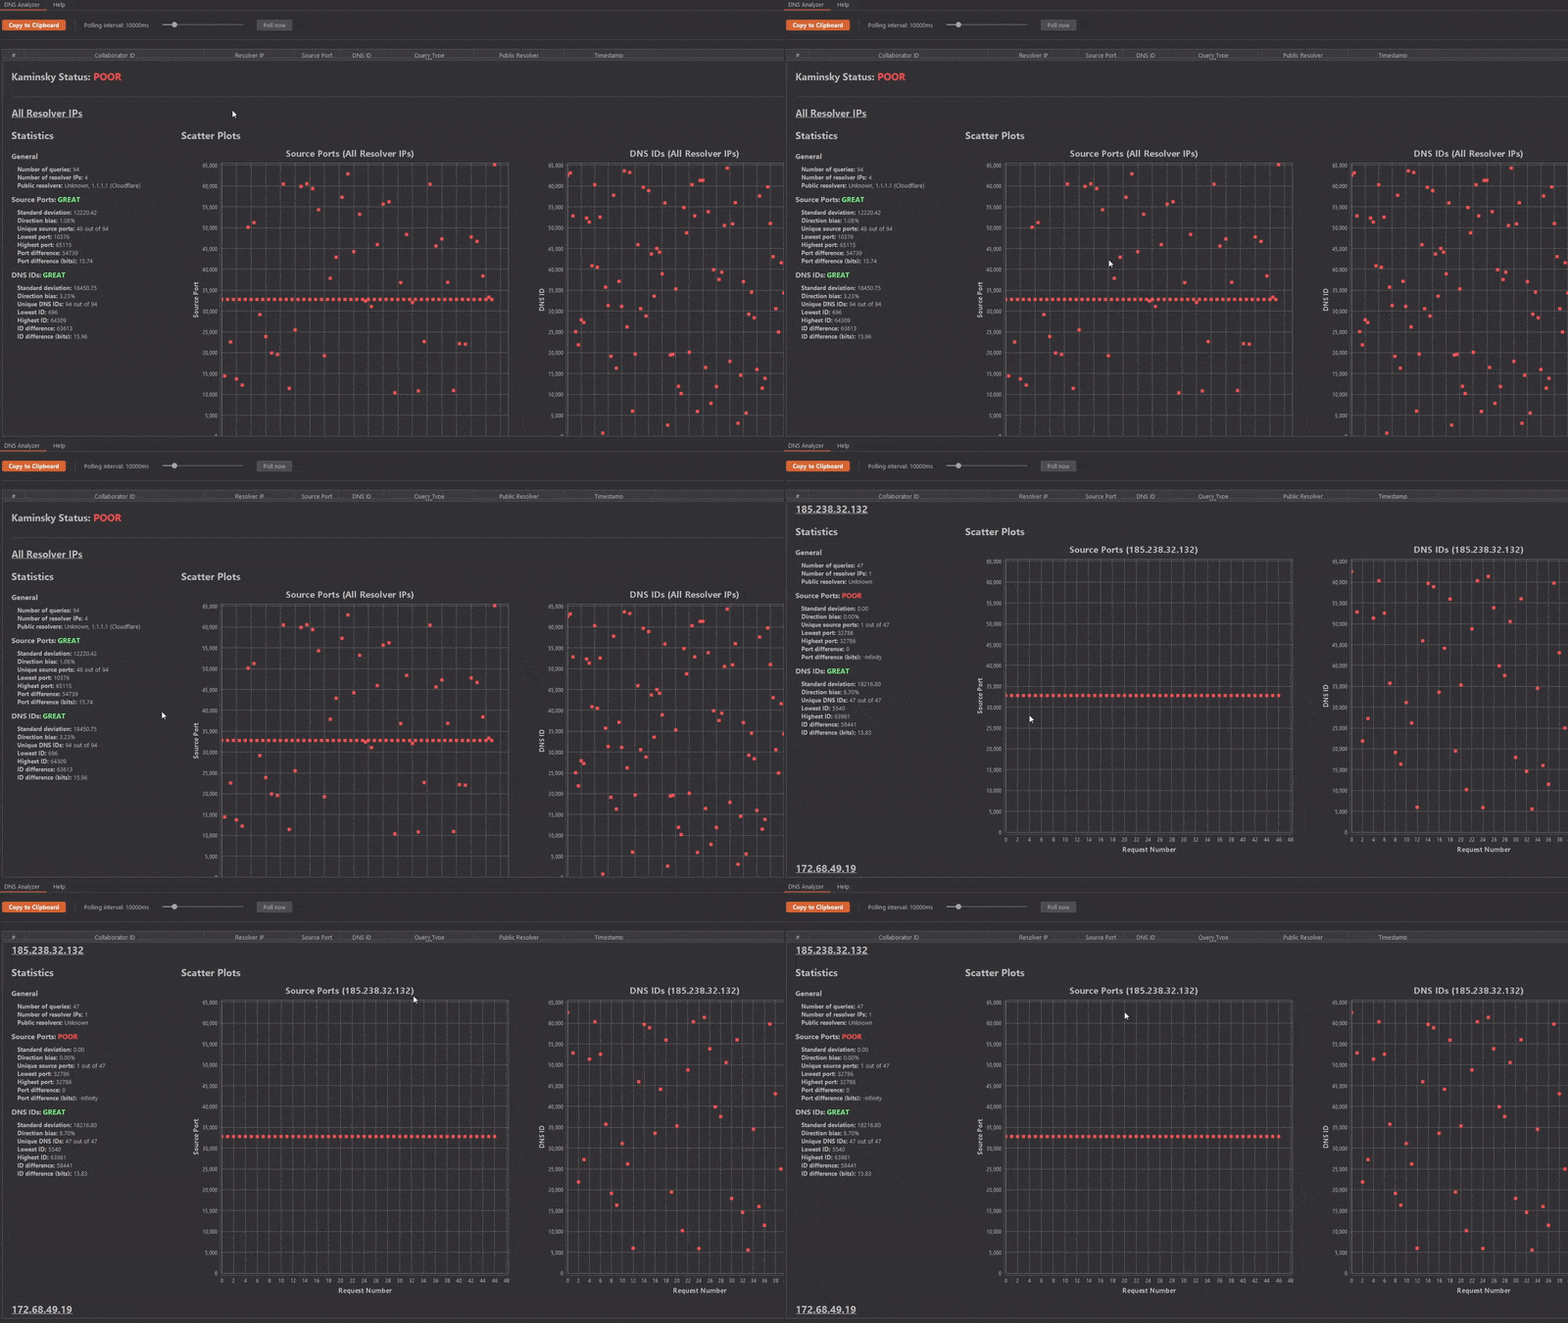
But wait! Why is the Kaminsky status GREAT? Shouldn't it be POOR?
Yes! However, due to the behavior of some DNS resolvers, it's hard to detect such distributions automatically without causing lots of false positives. Nevertheless, this distribution is vulnerable!
Human: 1, Machine: 0
In the above example it is important to mention that such distributions of source ports actually exist! Sometimes DNS resolvers can be very convoluted and individual DNS resolutions can take very different paths. This is why the results pane is separated into different sections based on the external resolver IP address. The first section "All Resolver IPs" includes DNS queries from all resolver IPs. After that each individual resolver IP address is listed.
As the above animation shows, static source ports were only used by one specific resolver IP address!
Aside from the Kaminsky status and scatter plots, the statistics and general info sections can contain crucial information as well. For example, sometimes web applications are using large public DNS resolvers like Google, Cloudflare or Cisco, which are generally more secure and most likely not vulnerable. If you seem to have found a vulnerability in one of them, it's most likely a false positive!
Bug Bounty Considerations
Should you be looking for DNS vulnerabilities in bug bounty domains?
YES! However, only report a DNS vulnerability if:
- infrastructure is in the scope of the bug bounty program
- you've confirmed the vulnerability via in-depth DNS analysis (e.g., via the DNS-Analysis-Server)
Essentially, don't flood bug bounty programs with DNS vulnerability reports without doing proper research first!
Also, if you've found a vulnerable web application, let us know on Twitter @sec_consult.
Backstory and Honorable Mentions
Back in 2021, when we published our first DNS blog post, Timo had chat with James Kettle (@albinowax) about implementing a Burp extension that uses Burp Collaborator for DNS analysis (so basically what the DNS Analyzer is today). After some back and forth, this led to a feature request in the Portswigger forum. After promoting the feature request in one of my guest lectures at FH Campus Wien, the feature request got some traction and was eventually implemented in version 2022.12.4 of Burp Suite.
So, in conclusion, a big THANK YOU goes out to:
- James Kettle for his crucial initial input
- Portswigger for honoring and implementing feature requests from the community
- The students of FH Campus Wien for pushing the feature request
Final Words
This sums up the most important facts about the DNS Analyzer!
The DNS Analyzer was written by Timo Longin, aka Login. If there are any further questions you can reach out to him on Twitter (@timolongin) or on Mastodon (@login@infosec.exchange).
Also, the DNS Analyzer will hopefully soon be available via the BApp Store!
Happy hacking!
This research was done by Timo Longin and published on behalf of the SEC Consult Vulnerability Lab.

